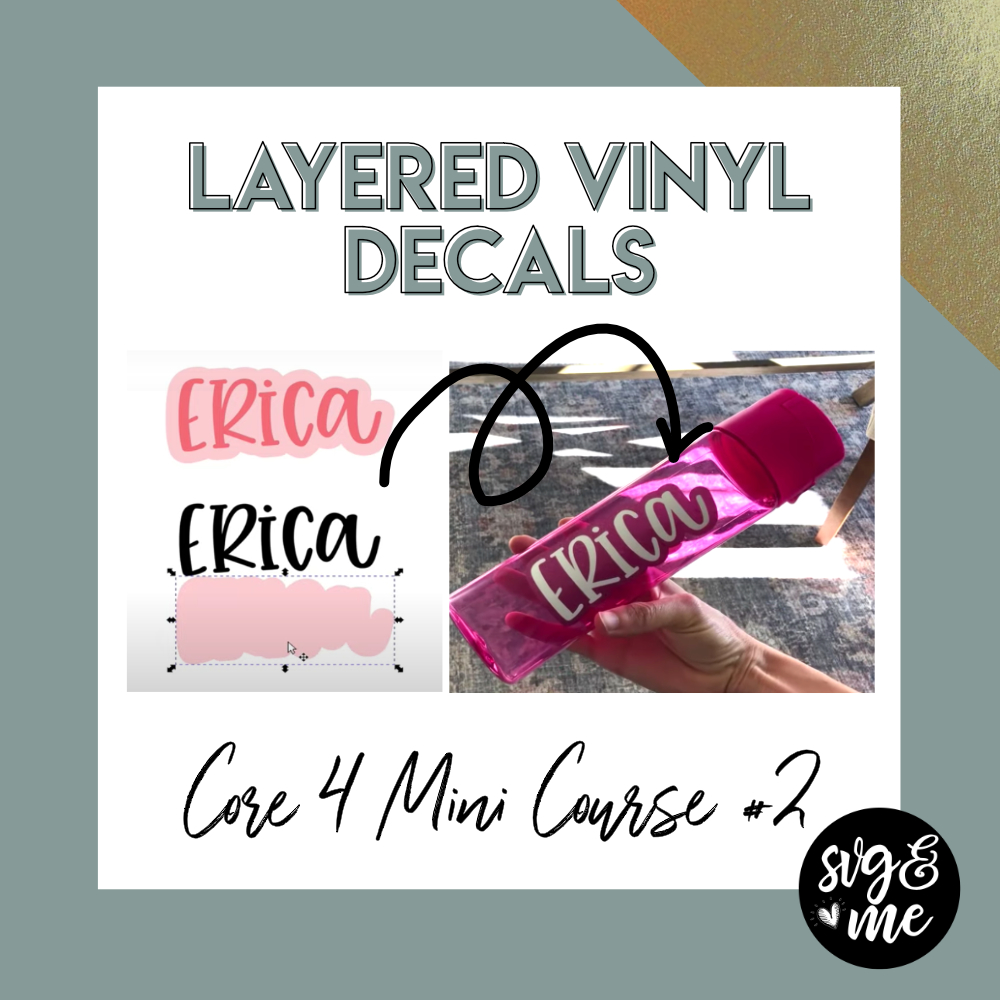
Core4 Video #1: How to Design a Card from Scratch!

How to Make a Card in Cricut Design Space

Welcome to the Free Core 4 Mini Course where I am going to teach you the 4 essential skills that every Cricut beginner needs to know when getting started!

Watch the entire series and you will be WAY ahead of most newbies and so much more confident with using your Cricut…

So, let’s get started!

This first video I am teaching you how to create a card from scratch in Design Space and then cut it on your Cricut.

Everyone from complete beginners to those who have been working with Cricut for a while have commented how valuable the tips & tricks in this video were!

Links Mentioned (contains affiliate links):

This tutorial works with Cricut Maker, Cricut Explore Air 2 and Cricut Explore Machines

For Cricut Joy: Remove score line and reduce card cover size to 8″x4″ to make compatible

How to Upload a SVG

How to Upload a SVG

First of all, you may be wondering…

What the heck is a “SVG”?

Well, it stands for “Scalable Vector Graphic” and is just a fancy name for the file type that works best with cutting machines like Cricut, Silhouette, ScanNCut, etc (almost all cutting machine types can use SVG files).

SVGs are highly preferred over JPG or PNG images for a couple reasons:

  • You can upload them as layered designs where you can easily ungroup the various pieces and cut them out of different colors.
  • They can be resized to any size without getting pixelated. Pretty cool, right?

Now that you understand what they are and why they are the best files to use, let’s walk through how to upload them into your cutting software!

In this video I will cover how to upload for all 3 of the most popular machine types: Cricut, Silhouette, and Brother ScanNCut machines:

Video Timestamps:

  • 0:00 How to Download and Unzip the SVG
  • 1:50 How to Upload to Cricut Design Space
  • 4:10 How to Upload to Silhouette Studio
  • 8:41 How to Upload to Canvas Workspace (ScanNCut)

Links Mentioned in Video (affiliate links):

Kindness is Contagious #2

There is understandably a lot of uncertainty and overwhelm right now with COVID-19. But this free SVG is a good reminder that kindness is even more contagious!

Compatible with Cricut, Silhouette and other cutting machines. Easy to resize, change colors and customize however you’d like. Don’t miss the rest of our huge free svgs library either!

Please Remember

All free downloads on SVG & Me are for Personal Use Only. Please refer to our copyright and license page for more information.

The free download includes (1) .zip file with:

  • 1 SVG file – Upload to Cricut Design Space,  Silhouette Designer Edition, Adobe Suite, Inkscape and more

These SVGs are totally free, but if you want to help you can spread the word by clicking the red or blue share buttons below. I really appreciate it!

Enjoy your SVG and happy creating!

Learn to Create Your Own SVGs Today!

Kindness is Contagious #1

There is understandably a lot of uncertainty and overwhelm right now with COVID-19. But this free SVG is a good reminder that kindess is even more contagious!

Compatible with Cricut, Silhouette and other cutting machines. Easy to resize, change colors and customize however you’d like. Don’t miss the rest of our huge free svgs library either!

Please Remember

All free downloads on SVG & Me are for Personal Use Only. Please refer to our copyright and license page for more information.

The free download includes (1) .zip file with:

  • 1 SVG file – Upload to Cricut Design Space,  Silhouette Designer Edition, Adobe Suite, Inkscape and more

These SVGs are totally free, but if you want to help you can spread the word by clicking the red or blue share buttons below. I really appreciate it!

Enjoy your SVG and happy creating!

Learn to Create Your Own SVGs Today!

Kindness is Contagious Simple

There is understandably a lot of uncertainty and overwhelm right now with COVID-19. But this free SVG is a good reminder that kindess is even more contagious!

Compatible with Cricut, Silhouette and other cutting machines. Easy to resize, change colors and customize however you’d like. Don’t miss the rest of our huge free svgs library either!

Please Remember

All free downloads on SVG & Me are for Personal Use Only. Please refer to our copyright and license page for more information.

The free download includes (1) .zip file with:

  • 1 SVG file – Upload to Cricut Design Space,  Silhouette Designer Edition, Adobe Suite, Inkscape and more

These SVGs are totally free, but if you want to help you can spread the word by clicking the red or blue share buttons below. I really appreciate it!

Enjoy your SVG and happy creating!

Learn to Create Your Own SVGs Today!

Gratitude Mirror Decal

Hey everyone!

With all this COVID-19 craziness, I started a daily practice that I LOVE and that is to start each day with 3 things I am grateful for.

Challenge yourself to not repeat and come up with brand new things each day.

This daily habit shifts you into such a great mindset to start the day and makes practicing gratitude a habit that can truly make all the difference!

After all, kindness and gratitude are contagious too! โค๏ธ

Want to join me?

Well I’ve got a free gratitude decal SVG for you to download and use! This makes it even more fun and reminds you to do this habit each day when you go to brush your teeth.

Creating this gratitude mirror decal is a super beginner-friendly project that your kids can do as well if you’re looking for a great quarantine activity today ๐Ÿ˜‰

How to Make a Gratitude Mirror Decal:

Download the decal below then watch this video walking you through exactly how to make it! (includes instructions for Cricut, Silhouette and ScanNCut users)

DOWNLOAD FREE GRATITUDE MIRROR DECAL SVG

I’ve also included written steps below for you to refer back to after watching the step-by-step video.

  1. Download our gratitude mirror decal SVG (personal use only).
  2. Upload to your cutting software.
  3. Make sure dimensions are locked and resize to 5โ€ width.
  4. (Design Space Only) Select all and โ€œattachโ€
  5. Place vinyl in top left corner of your cutting mat and cut on the vinyl setting.
  6. Weed your decal.
  7. Apply transfer tape and burnish.
  8. Make sure decal comes off with transfer tape then place back on the backing and take to your mirror for application.
  9. Fold down the backing about 1/2 inch at the top and tape the decal on to your mirror using painterโ€™s tape.
  10. Slowly remove the backing as you smooth the decal on to the mirrorโ€™s surface.
  11. Burnish well then remove the transfer tape to reveal your decal!
  12. Each day write in 3 things youโ€™re grateful for using a dry erase marker and simply wipe off to erase and repeat the next day ๐Ÿ™‚

Looking for more ideas to fill your time during COVID-19 social distancing?

Don’t miss our free training on how to convert an image into a SVG – go register now!

Rudolph the Reindeer Lollipop Holder

Click the 4 arrows button in the bottom right corner to make the video full screen ๐Ÿ™‚

**Please note: this is a sneak peak of the 12 Days of Christmas Design Extravaganza I just added to our lifetime membership. To learn more about our membership, register for our free training today!**

On Day 5 of the 12 Days of Christmas crafting series, you’ll learn how to create this adorable Rudolph the Red Nosed Reindeer Lollipop Holder!

Make a bunch of them and put in a cup for a cute holiday decoration at a party or stick in your kid’s lunch box for a fun holiday surprise.

Have you caught the designing bug and can’t wait to learn more?

Join our SVG & Me membership today!

You’ll get access to the rest of the 12 days of Christmas series plus our Inkscape, Design Space, and Silhouette Studio courses. Plus, we’ve got over 70 tutorials like these in our members-only library with new ones being added regularly. All together, it is well over 15 hours of video content like these tutorials that you have at your fingertips to take your crafting to the next level.

Thousands of crafters have already joined – are you next?

Click here to take a video tour inside the membership.ย 

Christmas Countdown Bookmark

Click the 4 arrows button in the bottom right corner to make the video full screen ๐Ÿ™‚

**Please note: this is a sneak peak of the 12 Days of Christmas Design Extravaganza I just added to our lifetime membership. To learn more about our membership, register for our free training today!**

When I thought of this project, I envisioned starting a new tradition with your kids or grandkids where you can read a new Christmas book each night and then cross off each day as you countdown to when Santa comes on Christmas Eve!

Wouldn’t that be fun?

Even if you don’t have kids, it’s a great reminder to get in the habit to read each night before bed to wind down. Especially with it getting dark so early, it can feel cozy to curl up in bed with a book. Hope you enjoy!

Oh, and just a reminder that you can find the Better Together Font on dafont.com.

Need help making sure you upload correctly? Watch this video:

DIY Tic-Tac-Toe Ornament Game

Download the Tic Tac Toe Pieces Template

Click the 4 arrows button in the bottom right corner to make the video full screen ๐Ÿ™‚

**Please note: this is a sneak peak of the 12 Days of Christmas Design Extravaganza I just added to our lifetime membership. To learn more about our membership, register for our free training today!**

Keep kids entertained at the table while you’re talking with this fun DIY tic-tac-toe ornament game that is so easy to make! But, beware…you’ll soon be stealing it to play yourself ๐Ÿ™‚

Click the button below the video to download the candy cane and snowflake pieces templates I used or you can also create your own. Enjoy!

Want help uploading to your cutting software? Watch part 2 of the video:

DIY Santa Belt Snack Toppers

Better Together Font

Click the 4 arrows button in the bottom right corner to make the video full screen ๐Ÿ™‚

Hey there! Your snacks are about to get a lot more jolly this holiday season with our DIY Santa Belt Snack Toppers that are super easy to make!

Kids will love the surprise when they open their lunchbox or they are great for holiday goodies or party favors.

**Please note: this is a sneak peak of the 12 Days of Christmas Design Extravaganza I just added to our lifetime membership. To learn more about our membership, register for our free training today!**

And if you want help figuring out how to upload to Design Space or Silhouette Studio, check out the video below:

How to Create 3D Tree Templates

Download Tree Silhouette

Click the 4 arrows button in the bottom right corner to make the video full screen ๐Ÿ™‚

**Please note: this is a sneak peak of the 12 Days of Christmas Design Extravaganza I just added to our lifetime membership. To learn more about our membership, register for our free training today!**

I recommend cutting this out of chipboard or balsa/basswood. Here are the supplies and settings I recommend. Unfortunately, Silhouette does not do a great job of cutting these thicker materials but if you have a Silhouette and have found cut settings and materials that work for this project please share in the comments!

Make sure to use a strong grip mat on any of these materials and tape down the material to further secure it for a better cut.

Post contains affiliate links for supplies that may provide me a very small commission at no added cost to you!

P.S. Cricut chipboard and basswood are 50% off right now! (for Cricut Maker only)

Cricut Maker:

  • Cricut Chipboard (2mm): use knife blade and default chipboard settings (should have Cricut logo next to the cut setting indicating that it is a Cricut material)
    • If you don’t have a knife blade or struggle with using it, you can use the medium weight chipboard option and cut settings directly below.
  • Medium Weight Chipboard: Custom – 350 pressure, 7x, using deep point blade
    • This is what I use because it’s very inexpensive and I find that the deep point blade works best for this because it’s quick and the knife blade occasionally gets stuck in the corner of the inside notches of the design.
  • Cricut Basswood (1/16″): use knife blade and default basswood settings (should have Cricut logo next to the cut setting indicating that it is a Cricut material)
    • If you don’t have a knife blade or struggle with using it, you can test the Cricut Explore balsa and basswood settings below using the deep point blade but make sure to use the 1/32″ thickness only

Cricut Explore Series:

  • Medium Weight Chipboard: Custom – 350 pressure, 7x, using deep point blade. (this is the material and setting I used – see above)
  • Balsa wood, 1/32″*: Custom – 167 pressure, 5-7x, deep point blade
  • Basswood, 1/32″*: Custom – 350 pressure, 5x, deep point blade
    • *only use 1/32″ thickness of balsa/basswood and keep in mind that the results are more inconsistent and may require multiple tries

You’re Radish

Turn this fun free SVG into a toddler shirt or put it on a farmer’s market tote bag. So many fun projects you could create!

Compatible with Cricut, Silhouette and other cutting machines. Easy to resize, change colors and customize however you’d like. Don’t miss the rest of our huge free svgs library either!

Please Remember

All free downloads on SVG & Me are for Personal Use Only. Please refer to our copyright and license page for more information.

The free download includes (1) .zip file with:

  • 1 SVG file – Upload to Cricut Design Space,  Silhouette Designer Edition, Adobe Suite, Inkscape and more

These SVGs are totally free, but if you want to help you can spread the word by clicking the red or blue share buttons below. I really appreciate it!

Enjoy your SVG and happy creating!

Learn to Create Your Own SVGs Today!