I get it. Starting out as a beginner Cricut user can be super intimidating.
You don’t know what to buy, what you need to learn and where to begin. Since you don’t have an unlimited budget or time, these Cricut hacks are some great tips from experienced crafters that will save you serious cash and frustration. Check them out!
Please note this post contains affiliate links that may provide me a small commission at ZERO added cost to you, which make it possible to bring you more free content!
1. Mechanical pencil + needle = weeding hook?!
@juniperpointdesignco PART 26 – Crazy Cricut Hacks » HOMEMADE WEEDING TOOL‼️ ##cricut##cricuthacks##series##juniperpoint##cricuttutorials##hacks##howto##vinyl##cricuttools
♬ FEEL THE GROOVE – Queens Road, Fabian Graetz
2. Use Glad Press ‘n Seal instead of transfer paper as a very cheap substitute!
This is an awesome hack in a bind. I also think that a great budget friendly substitute that works a bit better is use contact paper that works great for transferring images for about $5 on Amazon or at Walmart. (via Artsy Fartsy Mama)
3. Remove tiny pieces from Cricut cutouts with a sticky lint roller.
A lint roller can also be used to remove glitter or left over debri from your cutting mat AND helps keep them sticky at the same time! Seriously, this is like a 3-for-1 hack 🙂 (via Pinterest)
4. Cheap Way to Clean Your Cricut Mat

My favorite way to quickly and easily clean my mats is just plain Dawn soap and warm water. Or, if its just a quick clean up I will use a non-alcoholic baby wipe. However, some people swear by Awesome spray (yep, that’s the brand name) that you can get at Dollar Store. I’ve been told to only use it on the older mats (with flowers) though. I try to keep things as natural as possible and steer clear of harsh chemicals, so Dawn and warm water or baby wipes is the way to go for me!
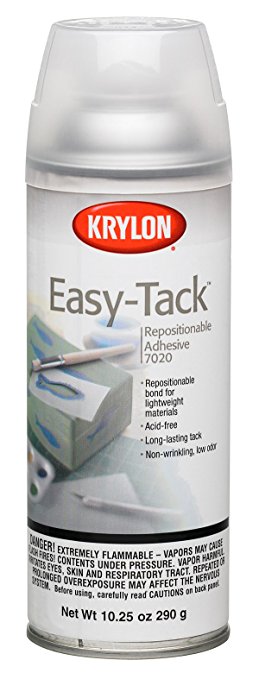
5. How to “Resticky” Your Cutting Mat
Is “resticky” a word? I don’t think so, but it gets the point across so we’re going with it!
When you first get your mat, it will feel SUPER sticky. However, over time, it will start to loose the stickiness, so this is a great trick to make it last longer so you don’t have to replace them so often (again saving money!)
Simply tape off the edges of your mat with painter’s tape and spray this magical stuff lightly over your mat to get your sticky back. Buy a bottle of Easy-Tack here. For more info on this method, check out this post by The Scrapmaster.
Also, (bonus hack!) I mentioned above that new mats are almost too sticky. Well, you may want to press your hands all over them a few times to help “wear” them in before your first project. Also, make sure to use the right mat. The green mat will be too sticky for cardstock at first so you’ll want to use your blue mat.
6. Use a tennis ball to get decals to stick to textured walls.
Super smart! Makes the vinyl stick really well while being gentle on your walls. Win win!
7. If you lose your burnishing tool, use a credit card or old gift card to rub the design well for an easy transfer after weeding.

8. Cut freezer paper using your Cricut to create a stencil that is practically free.
A great trick if you want to make a wooden sign for instance.
9. Keep the plastic sheet that comes with your mats and put it back on after use to prevent pet hair or dust from sticking to them.

10. Cut out cardstock sizing templates to easily visualize the correct design size for your project.
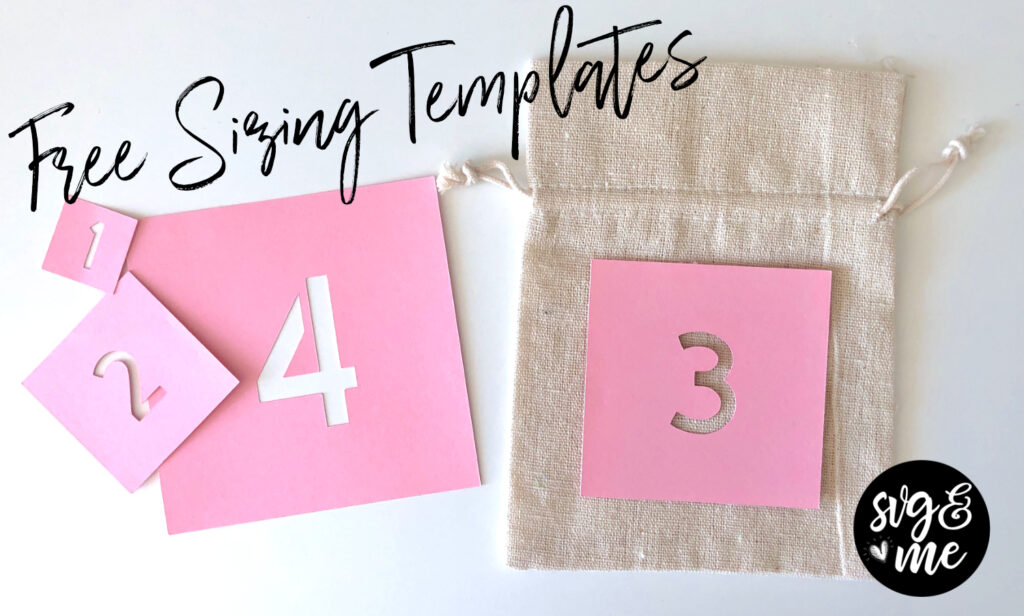
This is such an easy hack using just cardstock and our free sizing templates (download here). Once you cut them out, you can use them as a quick reference tool to help decide the correct size design for shirts, vinyl decals, and all sorts of different projects!
11. Wrap masking or painters tape around your hand to easily remove scraps when weeding.

You won’t believe how much this simple tip will speed up your weeding process which can get quite tedious for more intricate designs like mandalas.
12. You know you can load your mat from either direction.

Yep! You can put the top of the mat or the bottom of the mat into your machine first when loading your project and it will cut the exact same way!
This is especially helpful when the top area of your mat starts to lose it’s stickiness because you can simply flip it around to prolong the life.
But if you use this hack…make sure you read through #14 which will really come in handy!
13. To clean your Cricut blade, poke it in and out of a ball of aluminum foil.
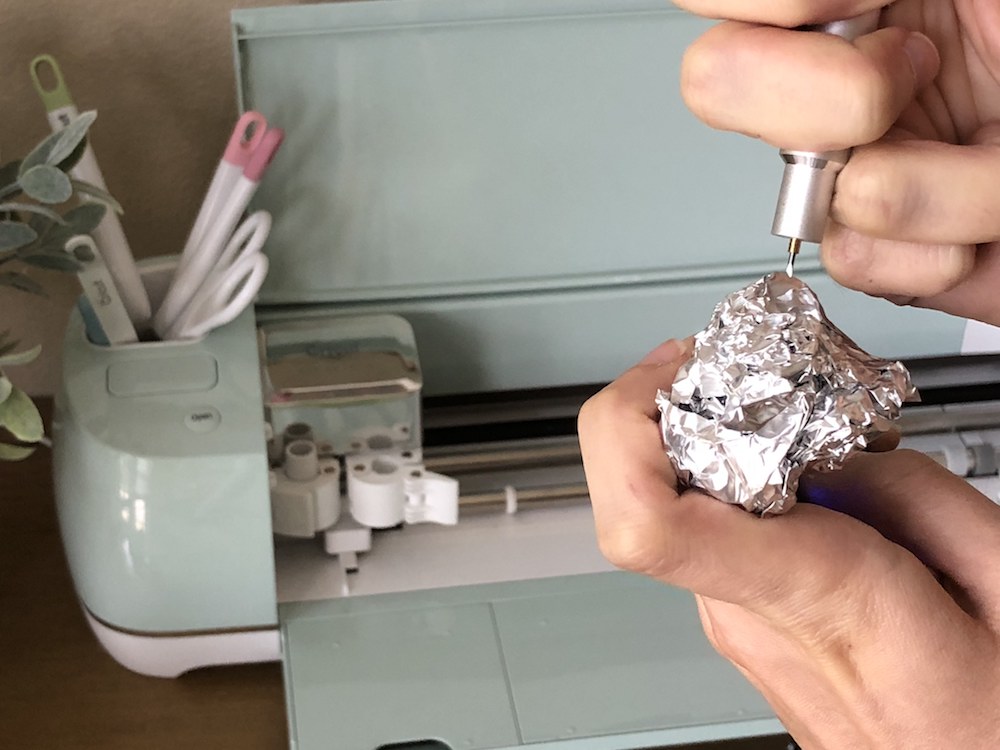
This is perhaps one of my favorite and most useful hacks. You won’t believe the difference and how much more life you can get out of a blade when you do this regularly. It’s like maintaining your car or any other piece of equipment.
I find especially after cutting things like glitter cardstock or adhesive vinyl, this trick does wonders to clean off any debris for a smoother next cut.
14. Flip around your cutting mat and mark the inch measurements for easier placement when loading upside down.
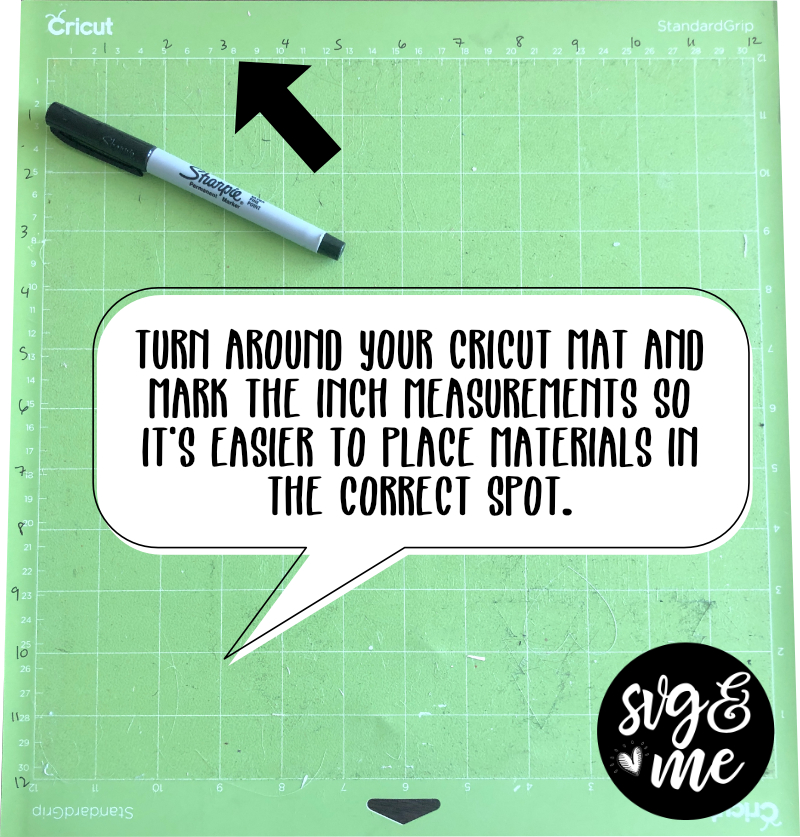
As I mentioned in hack #12, you can load your mat either top or bottom first. However, the only downside of that is that when you load it with the bottom first, it is harder to place materials in the correct position because it has cm measurements instead of inches.
The solution? Use a sharpie and mark the inch measurements right on the mat for reference! Easy peasy!
15. Spice up your designs with new fonts! Find a TON of free ones at dafont.com.
Just be careful if you are using them on products you are selling – you will need a commercial use license.
16. Download Inkscape to create your own SVGs for free!

Need help learning how to master Inkscape? Check out our free training on How to Create SVGs Using Inkscape!
What to read next: 9 Genius Cricut Ikea Hacks for Crafters
Which of these Cricut hacks was your favorite?
What fantastic tips thank you
You’re welcome – glad you found them helpful!
I’ve tried Easy Tack on all of my 5 cutting mats. My Light was too strong, totally my fault. I’d like to try Loctite on my next tacky project. As it is now I can only use 2 out of the 5 mats. Lesson learned.
Fantastic tip about the freezer paper and Speedball paint!
Yes love it!
I even use a paintbrush and fabric paint
The masking tape for little pieces tip will save my life!
That was one of my favorites as well, Jessica!
I love there tape around your hand. I was trying to find an easier way to keep all those pieces together. I normally just lay a tissue down and stick them to it and just throw away after.
A small shop vac tape the hose to your work table and watch the weeding scraps dissappear as you weed.
Loved all of the tips! Thanks!
Glad you enjoyed them, Lori!
This was awesome!
So glad you enjoyed the post 🙂
THANK YOU, EVERYTHING COSTLY THESE DAYS ALWAYS LOOKING FOR SAVING METHODS. GENIOUS
You’re very welcome!
Be careful on #5 per Cricut that adhesive can gunk up the machine( collects on the rollers) and can cause issues and even void your warranty.
The one about loading mat correctly… you can turn it and load the opposit from the cut out to get full use of you Matt. Per cricut that is okay.
Thanks for the hints.
Great points!
That is why you need to tape off the areas that aren’t in the grid. These are the only areas that go thru the rollers. And I was going to mention that you can use both ends of the mat as well. You’ll know if you put the other sides in because it won’t fit!
Not sure about that particular adhesive but I’ve used Aleen’s tacknot over and over, for a couple years now with zero problems. I ageee with you on the second point. Both sides of the mat can and should be used.
I have an empersions 2 haven’t been happy with it it’s out of date now they don’t sell cartridges
Do you know if there is software or computer app can get to get back using it
Hi Trish, Cricut is shutting down Craft Room, so the older Expression machines will be cartridge only. Check your email though because they are offering a very generous discount to upgrade to a newer machine that works with Design Space. You can even link your cartridges to Design Space too once you upgrade. We also have an article on the Explore Air 2 vs. Maker if you are interested in upgrading and deciding which to buy.
Is there anywhere I would need to sign up to get the email or do they just send it out to everyone that has a Design Space Account?
Thank you so much these tips r wonderful this one bout sharpening the cutter is the best and the wax paper u r right y didnt i think of that lol
How will cricut know where to send the email that has the offer for a new machine?
You can check eBay or Amazon for old cartridges.
Thank you for the tips. I’m super excited about cricut!
Yay! So excited for you!
I have a question can used cricut cartridges be relinked ? Ty
I believe so. I would reach out to Cricut support if you have questions on this.
Thanks for the enfo it will come in handy 🙂
You’re welcome!
Thank you so much these tips r wonderful this one bout sharpening the cutter is the best and the wax paper u r right y didnt i think of that lol
Great tips! When I cut out a stencil and weed it. Then apply transfer tape
And move it to the item. I apply the stencil but when I try to remove the transfer tape I can’t get it off without
Practically tearing up the stencil. It’s not easy or fun! Any suggestions? I’m about to give up!
It sounds like your transfer tape is too sticky – there are varying levels for different project’s needs. I would try transfer tape or a low tact transfer tape product instead.
If your transfer tape is too sticky, but you bought it and want to use it, just place it on a
Microfiber towel, and pull it back off. Do this several times until the tackiness of the tape is where you want it for your project.
Good idea!
I use cheap old clear contact paper and it works great!!!
Thank you for sharing your tips.
Of course!
All great tips, thank you so much.
You’re very welcome!
Thanks for the tips, Erica. I’ve tried using an aluminum foil ball to sharpen my blades, but not much success.
I am about to make my first stencil for painting on wood. Does the freezer paper allow bleeding around the edges (paint to seep under the paper and make for fuzzy lines)? Is there a way to secure the paper temporarily so that won’t happen?
i always put a thin coat of mod podge over my stencil so i dont get any bleed
Thank you for sharing. Very helpful.
You’re welcome!
Loved all your hacks, i have used a few of them and they work.
Awesome, thanks!
How do you get the fonts to the cricut design from dafont.com?
Hi Amber, they will automatically import into Design Space when you install them on your computer. If you don’t see them, make sure to close and reopen Design Space and you may need to restart your computer.
I didn’t know Cricut was shutting down Design Space and I read in the comments above that they will send out an email with a generous offer to upgrade. Do I need to sign up anywhere to get the email from them?
I always like to hear anything that can save me money. Awesome tips, keep them coming!
Yay! Glad you enjoyed them!
Thank you for sharing your tips & tricks. I especially like the Glad Press & Seal as I am working on a project without transfer paper, I do have Press & Seal in my pantry.
They shut down Cricut Craft Room. Design Space is alive and well!
Thanks for all the tips. I’m new to cricut and look forward to trying some of these!
Great! You’re welcome!
Great tips, thanks
Thank you so much for the tips. I especially liked the balled up aluminum foil to sharpen the blades. I use the same method for sharpening my scissors. Instead of balling it up, just cut through a sheet of aluminum foil several times. Thanks again for the tips!
Thank you for the wonderful tutorial!
Thank you for sharing your tips and tricks.
I bought a Brother ScanNCut CM900 about a week ago unfortunately I cannot get started as both mats (standard and low tack) have air bubbles under the protective cover. I have tried to remove them but they will not go. I cannot get beyond this point. Is there a way of removing them?
Thanks for tips very helpful
SOMEONE PLEASE HELP!!! I just got my new explore air 2 and I want to know how to use it without the stylus. When I open a project and it calls for the stylus, how can I by-pass the stylus?
Hi there,
You can just delete the score lines in the project and fold manually. This way it won’t call for the scoring stylus.
OMG! What an eye opener! I am new to this and have found this information so valuable! Thank you! Thank you! Thank you!
Thank you so much for the share of great ideas. Good to save money if you can, everything cost so much.
These are terrific! I’m so excited that I now have a Cricut Maker … and these have given me so many ideas! Thank you.
Thanks!!!!
Quick question:. Why does the Cricut blade chew up vinyl letters?
Thank you I appreciate your freebies especially for a clueless beginner ????????♀️
Some great tips here but just wanted to point out a couple of things. The tinfoil method doesn’t actually sharpen the blade it just cleans it but it’s a very useful tip which I do all the time. Also, marking the mat with an arrow seems a little pointless when there is an arrow shaped cutout out (used for hanging) already. Besides, the mat can go the opposite way anyway. Some great tips nonetheless
The Inkscape recommendation 😍